Retrieve NFT data from IPFS
In this guide, you'll learn several methods for retrieving NFT data that's been stored with NFT.Storage.
All data stored using NFT.Storage is made available for retrieval via IPFS, the InterPlanetary File System. IPFS is a distributed, peer-to-peer network for storing and sharing content-addressed data.
If you've collected an NFT that uses IPFS, this guide can help you understand how IPFS addresses work and how to view your data using HTTP gateways or native IPFS tools.
You can also find out how to make archival copies of your NFT data using IPFS tools.
If you're building a platform or marketplace that needs to fetch NFT data on behalf of your end users, please see the architecture considerations guide
Understanding IPFS addresses
IPFS uses a technique called content addressing to uniquely identify each piece of data with a short string of characters called a Content ID (CID).
A CID usually looks something like this:
bafybeigvgzoolc3drupxhlevdp2ugqcrbcsqfmcek2zxiw5wctk3xjpjwy
If your NFTs use IPFS best practices, the link from the blockchain to your IPFS data will be in the form of a URI that looks like this:
ipfs://bafybeigvgzoolc3drupxhlevdp2ugqcrbcsqfmcek2zxiw5wctk3xjpjwy
This is just a CID with an ipfs:// prefix added to make it easy to identify as an IPFS CID and not some other kind of random-looking data.
Some IPFS addresses also have a path component following the CID, like this:
ipfs://bafybeigvgzoolc3drupxhlevdp2ugqcrbcsqfmcek2zxiw5wctk3xjpjwy/amazing.gif
Here the /amazing.gif path points to an image file that's "inside" the IPFS directory with the CID bafybeigvgzoolc3drupxhlevdp2ugqcrbcsqfmcek2zxiw5wctk3xjpjwy.
URLs with the ipfs:// prefix can be used directly with a browser that supports IPFS like Brave. Once you've configured IPFS support, you can just paste an ipfs:// URL into your address bar and see content in your browser.
For other options, see the sections below on using HTTP gateways and running IPFS locally.
See IPFS addresses on the Web in the IPFS docs for more details on the different ways to link to IPFS data.
Finding the IPFS address for your NFT's metadata
Before you can retrieve your off-chain NFT metadata, you need to know where to find it. With IPFS, that means finding the IPFS address for your token's metadata which is recorded in the blockchain entry for the token.
You can often find this information on NFT marketplaces and other NFT explorer sites. For example, OpenSea's Details view includes a link to an NFT's "Frozen" metadata that's been stored on IPFS:
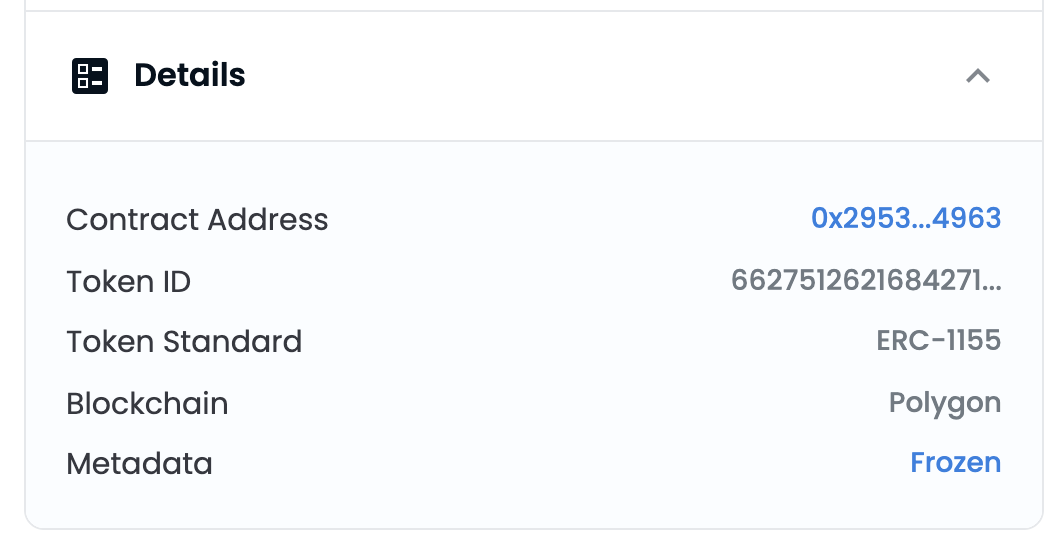
In the example above, the metadata link is https://ipfs.io/ipfs/bafkreigfvngoydofemwj5x5ioqsaqarvlprzgxinkcv3am3jpv2sysqobi, which is an IPFS gateway URL that uses the public gateway at https://ipfs.io.
You might see a different gateway host instead of ipfs.io, or a different kind of IPFS address depending on how your NFT was created and which platform you're using to view it. That's totally fine! All we need is the Content Identifier (CID), which is the random-looking string after /ipfs in the example above.
If your marketplace or wallet doesn't display the original metadata URI, you can try using a block explorer to consult the blockchain directly. The details of this will depend on which blockchain platform and smart contract standard your NFT was minted with.
Below is an example of calling the uri() function on a Polygon contract that conforms to ERC-1155:
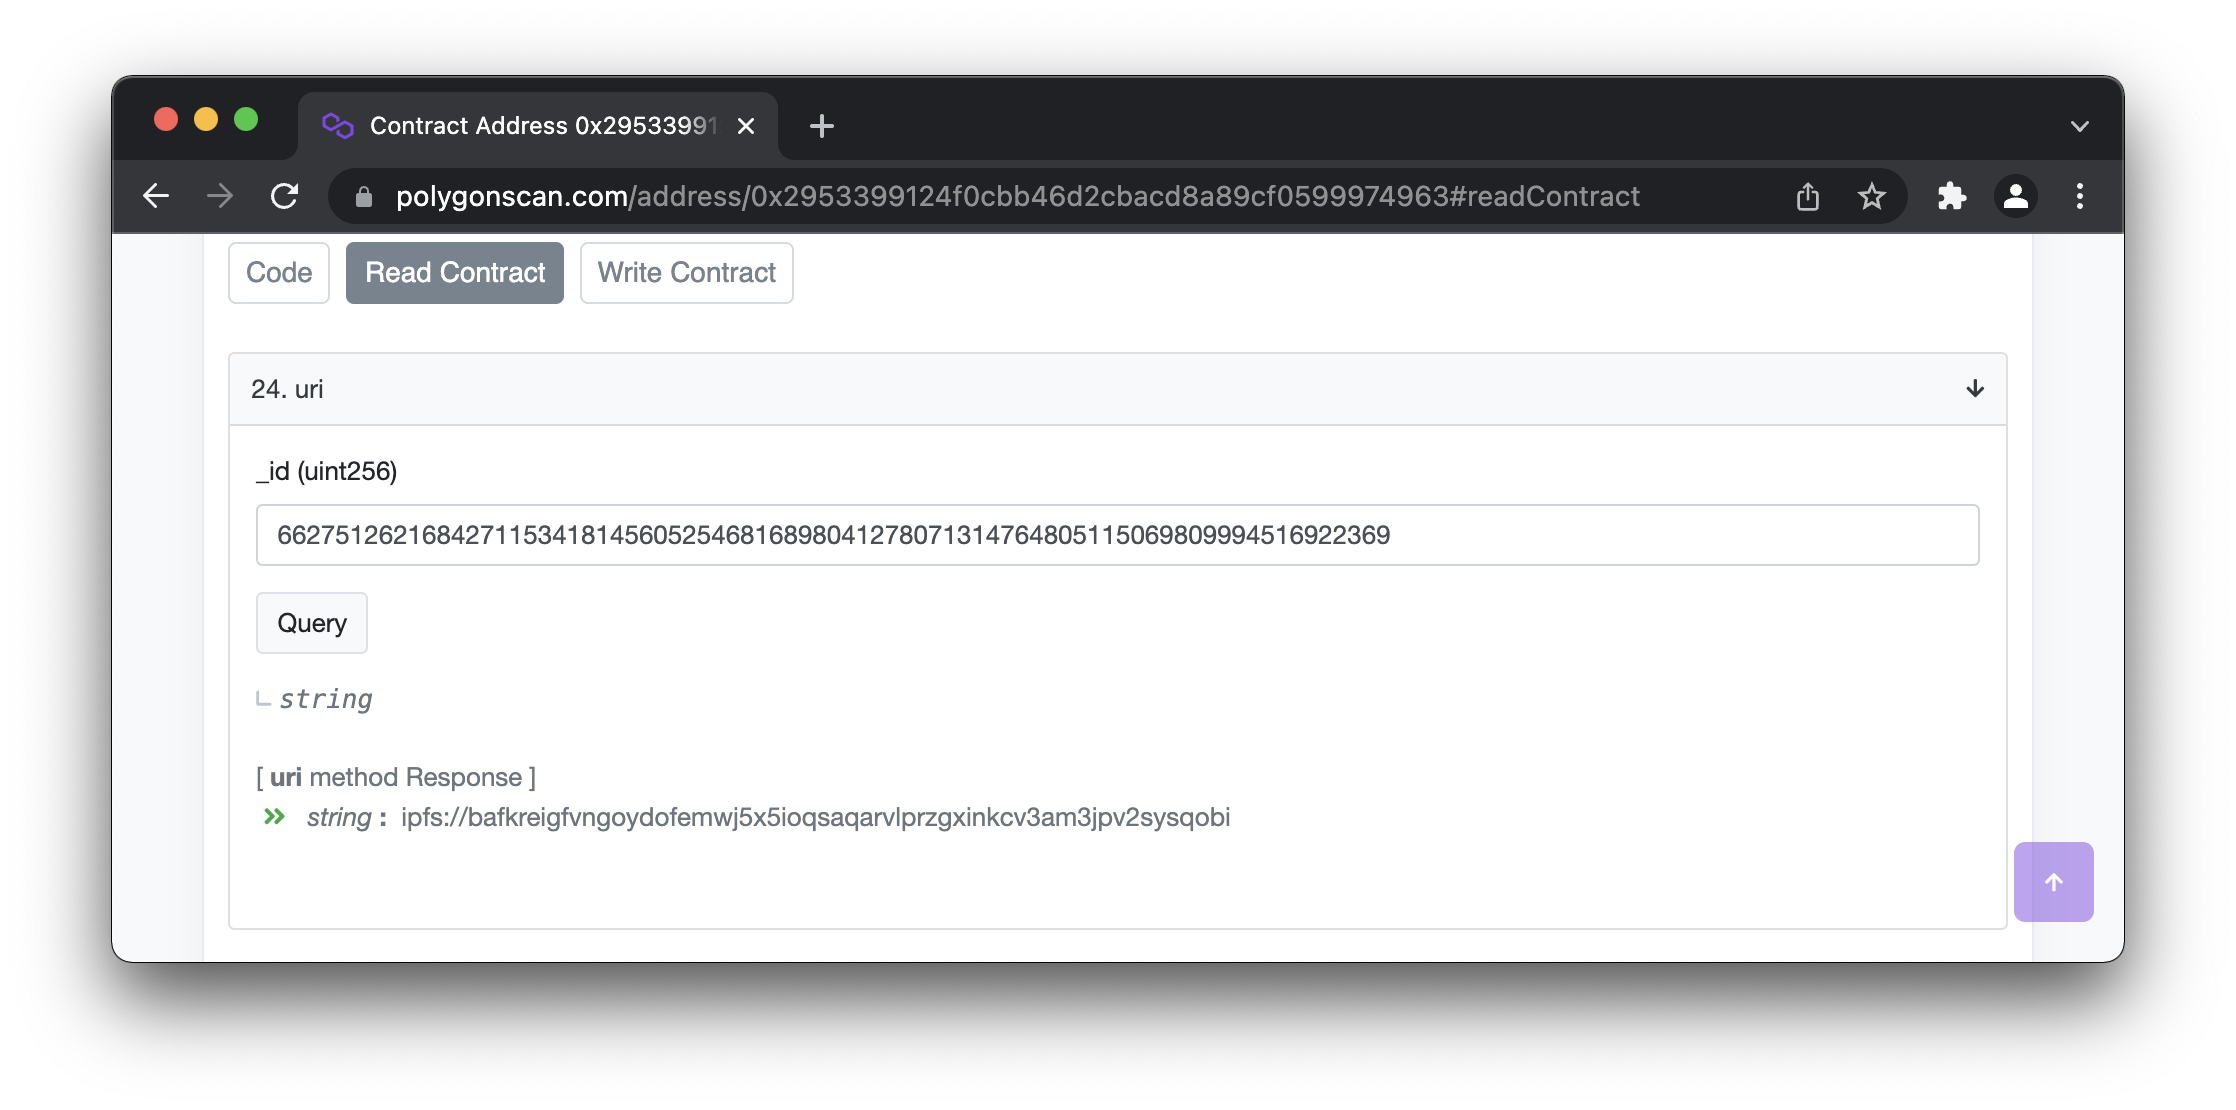
Now that you have your metadata address, you can download a copy using an HTTP gateway or IPFS on your computer.
Don't forget to look inside the metadata! NFT metadata usually contains links to other resources, especially in the image field. Take a look inside and check for other IPFS addresses so you can download the linked data too!
Option: Retrieve using IPFS HTTP gateways
Above we saw some examples of IPFS addresses that use the ipfs:// URL prefix.
You might also see HTTP links to IPFS content that look like this:
https://bafybeigvgzoolc3drupxhlevdp2ugqcrbcsqfmcek2zxiw5wctk3xjpjwy.ipfs.nftstorage.link
or possibly in this form, with the CID in the path instead of the domain name:
https://nftstorage.link/ipfs/bafybeigvgzoolc3drupxhlevdp2ugqcrbcsqfmcek2zxiw5wctk3xjpjwy
These are gateway URLs, which link to IPFS data using an HTTP gateway provider. Gateways provide a bridge between the peer-to-peer IPFS protocol and the HTTP protocol supported by all web browsers.
You can turn any ipfs:// URL into a gateway URL by choosing a gateway and replacing the ipfs:// prefix with https://<gateway-host>/ipfs/.
We recommend using the nftstorage.link gateway, which was built by the NFT.Storage team to optimize retrieval of NFT assets and includes a cache for data uploaded through NFT.Storage. You can learn more about the nftstorage.link gateway in our [Gateway overview guide][concepts-gateways].
To use the gateway at nftstorage.link with the above example CID, you would create the URL https://nftstorage.link/ipfs/bafybeigvgzoolc3drupxhlevdp2ugqcrbcsqfmcek2zxiw5wctk3xjpjwy/amazing.gif. Clicking that link should take you to an image served by the gateway host.
Option: Running IPFS on your computer
If you want to interact with the IPFS peer-to-peer network directly, you can install IPFS on your computer.
Once you have the ipfs command installed, you can download any IPFS data to your computer with the ipfs get command.
Running ipfs get <cid> (replacing <cid> with the CID for your content) will download a copy of the referenced data to your local computer.
You can also include a path after the CID, just as you can with IPFS URLs. So for example, ipfs get bafybeigvgzoolc3drupxhlevdp2ugqcrbcsqfmcek2zxiw5wctk3xjpjwy/amazing.gif will download the file amazing.gif.
While ipfs get is great for viewing your files, you can also add them to your local IPFS "repository", so that other users on the IPFS network can fetch the data directly from your computer. To do so, use the ipfs pin add command to tell your local IPFS node to fetch and "pin" the content:
ipfs pin add bafybeigvgzoolc3drupxhlevdp2ugqcrbcsqfmcek2zxiw5wctk3xjpjwySee the IPFS pinning documentation for more about pinning IPFS content.
Making archival copies of your NFT data
You can safeguard the data associated with your NFTs by downloading your collection to your own devices. This puts the data into your control and ensures that you're not dependent on any third party (including NFT.Storage!) for the longevity of your NFTs.
One of the great things about IPFS is that it allows anyone to provide a copy of a given piece of data, no matter who they are or where they're located. Because IPFS identifies files using a unique, verifiable Content Identifier (CID), IPFS links aren't tied to a single server or domain name. This means that even if every copy of your NFT data were to disappear from the IPFS network, you can take matters into your own hands and provide your local copy to the network, fixing all existing links to the data.
By contrast, a broken HTTP link is broken forever, unless the owner of the original domain name decides to fix it. Even if you had a perfect backup of the off-chain NFT data, you wouldn't be able to fix the link between the on-chain NFT record and the off-chain data without controlling the original domain name.
As more NFT platforms adopt IPFS and Filecoin, we expect wallets and other tools to add easy, "one click" archive downloads to simplify this process. If that's important to you, ask the makers of your favorite wallets and marketplaces to add archive support!
Making an archival copy of an NFT consists of three steps:
- Find the IPFS address for your NFT's metadata
The first step is to find the IPFS address of the NFT's metadata.
- Download an IPFS Content Archive (CAR) using the metadata address
Find the CID portion of the address you found in step 1. For example, if your NFT has the URI ipfs://bafkreigfvngoydofemwj5x5ioqsaqarvlprzgxinkcv3am3jpv2sysqobi, you just need the bafkreigfvngoydofemwj5x5ioqsaqarvlprzgxinkcv3am3jpv2sysqobi part. See Understanding IPFS addresses for more about CIDs.
Using the CID, you can download an IPFS Content Archive file (CAR), which contains the data exactly as it was encoded for storage on IPFS and Filecoin. This is important, because the same file can produce multiple different CIDs, depending on how it was encoded when adding to IPFS. By downloading a CAR, you preserve all the original CIDs and make it possible to re-provide the data in exactly the format it was in when the NFT was minted.
If you have IPFS running on your computer, you can use the ipfs command line tool to export a CAR:
ipfs dag export YOUR_CID > FILENAME.carReplace YOUR_CID with the CID you found above, and FILENAME with whatever you want to call the archive file. This should create a new file containing all of the data referenced by the CID.
If you're not running IPFS, some remote HTTP gateways allow you to make requests against the IPFS API. For example, you can use the gateway at dweb.link to export a CAR using the curl command:
curl -X POST 'https://dweb.link/api/v0/dag/export?arg=YOUR_CID' --output FILENAME.carReplace YOUR_CID with the CID you found above, and FILENAME with whatever you want to call the archive file. This should output the same CAR file as if you ran the ipfs dag export command locally.
- Examine the metadata for any additional IPFS links and download CARs for each.
Now that you've made an archive for the NFT metadata, there's one last step. Your NFT metadata may contain links to other data stored on IPFS, for example, images or video files.
You can extract the metadata from the CAR you just made with the ipfs-car tool, or just open the metadata address on an HTTP gateway to view it as a JSON text file.
Look for any additional IPFS addresses and make a note of their CIDs.
For each CID in the metadata, repeat the previous step to create a CAR file and save it alongside the CAR for the metadata.